Cycle Analyst V3
Grin Anchor Links Widget
The V3 Cycle Analyst is the next step for the CA product line to not only monitor what is going on in an ebike, but also control it. In the V2 CA we included basic throttle over-ride capabilities for speed, current, and low voltage limiting that proved quite popular, but fundamentally it was mostly a passive display. With the V3 Cycle Analyst, all the ebike signals, from your brake cutoffs to your throttle to your pedal sensor, are first intercepted at the Cycle Analyst. The CA then processes all of these inputs to determine how to control your bike, which it then does via one standard throttle output signal to the controller.
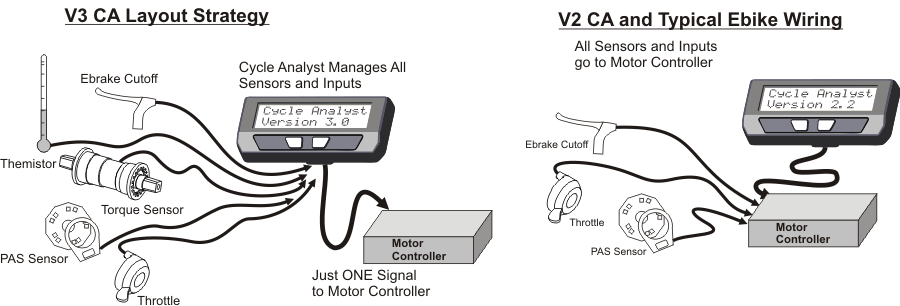
There are many advantages to this arrangement. In the traditional setup, any features that you wanted on the ebike, be it cruise control, torque sensing pedalec modes, temperature rollback etc. had to be supported by your particular motor controller. An OEM ebike company can design a custom controller that works with a specific set of input sensors, but DIY projects don’t have this luxury. With the V3 Cycle Analyst, you have access to all these advanced sensor and control schemes no matter what model motor controller powers your system.
Here are some of the more popular features you can include by using the V3 CA as your central ebike/EV console:
|
|
Plus many advanced capabilities to discover, and of course all the functionality that you have in the V2 CA like volts, speed, amps, amp-hours, %regen, watt-hours/km etc.
User Manuals
 Here is the manual for the current V3.1 Cycle Analyst device and firmware which explains the majority of settings and configurations that users would run into. For those with a technical background looking for a deep dive then much of the CA3's hardware and earlier 3.0X firmware is exceedingly well documented in the unofficial users guide written by Endless-Sphere forum member Teklektik. Of particular interest would be sections 6 (tips and tricks) and the appendices, which go over how to hook up a V3 Cycle Analyst to controllers that don't have a CA plug, how to log trip data with a smartphone, how to tune the PID speed control feedback loops, and numerous other topics.
One instruction often overlooked by new users is the importance of resetting the Cycle Analyst each time you start off with a fresh charge in the battery. This is done by pressing and holding the right button until the RESET message shows up.

Once the trip has been reset, the amp-hour accumulator and trip distance both return to zero. This enables you to see how many amp-hours have been consumed from the pack over the course of your trip(s) so that you have a very good idea of how much charge is remaining. It also ensures that the battery cycle counter is accurate and gives you more immediate wh/km trip statistics.
The two most common accessories for the V3 Cycle Analyst are the Auxilliary Input controls and PAS/Torque sensors, and information on the selection and setup of those devices is in the just linked pages rather than here.
Software Setup Utility
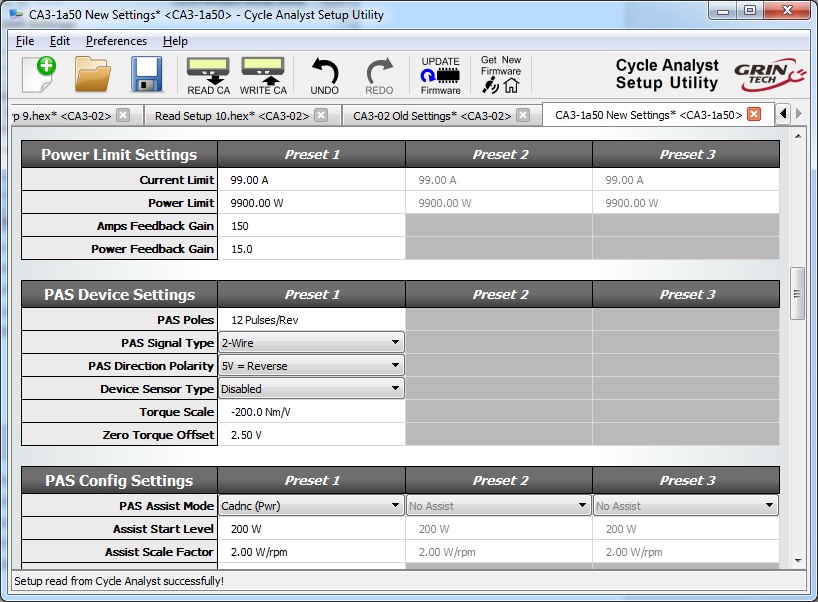
All of the Cycle Analyst setup parameters can also be configured from your computer using the Setup Utility program. The latest V1.5X releases have a button that automatically checks our servers for the latest firmware so that you can always access the latest beta and release builds too. We have made this software available on Windows, Linux, and MacOS.
Download latest CA Setup Utility for Windows
Download latest CA Setup Utility for macOS
Download latest CA Setup Utility for Linux
At the moment, these software packages do not have a conventional installer. The windows executable will extract the software package in a folder location of your choosing. With the MacOS build, you will generally need to drag the downloaded file into your applications folder in order to launch it.
Firmware Releases
The V3 Cycle Analyst firmware is in active development as we continue to refine and improve the feature set to suite the needs of technically savvy ebike users. Devices are shipped from Grin using the most recent stable release build, which at the moment is V3.14.
The most recent firmwares can be accessed by clicking the "Get Latest Firmware" button from the Cycle Analyst Setup Utility. In addition to the standard release builds, we also make available beta builds and various experimental and special purpose releases with features that aren't in the primary code.
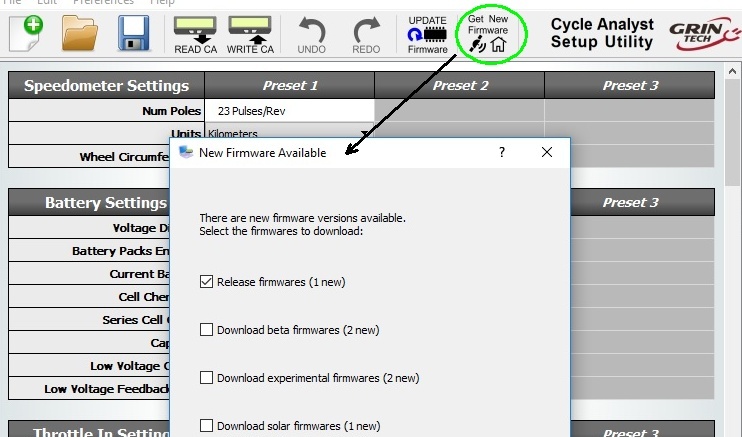
The Beta category includes firmware that has passed our internal testing and which is ready for broader usage and potential bug detection. Most new features go through several rounds of beta releases before going in primary code and this allows early adopters to try things out.
The Solar category is for firmware intended for solar EV applications, in which the normal auxiliary input plug is used as a second current sensor. This firmware allows vehicles to monitor their consumption current separately from the solar charging current. It was developed as part of our participation in the Suntrip solar bike race but can be used in any application where two independent currents need to be monitored. The CA3-13v1S code is for devices featuring just a solar shunt and has a 10Hz fast data log rate. The CA3-13a10SG assumes that a GPS device is connected as well and outputs lat/long/elevation/time data to the log file.
The Experimental category currently includes two branches that can be of interest to users doing more advanced vehicle analysis.
The 3.13X1G code allows the CA to read and display data from a NMEA output GPS sensor, including position, elevation, heading, time etc. Normally this would be achieved with a simple modification to the GPS Analogger device by connecting the GPS's output to the CA's serial input line via the existing TRS cable. The data output stream saved by the analogger then includes a single file with synchronized position information which simplifies uploading and viewing on our trip analyzer web application.
The 3.13X1F code is the same as our standard release firmware, but the normal 5Hz fast log rate has been upgraded to a 55Hz 115kBaud option. This allows high resolution transient analysis of vehicle performance using a computer or android phone with USB OTG to log the data. In 55Hz mode, the CA will not be able to communicate with the setup software or the analogger product because of the higher baud rate, it must be returned back to 1Hz log mode to work with these products.
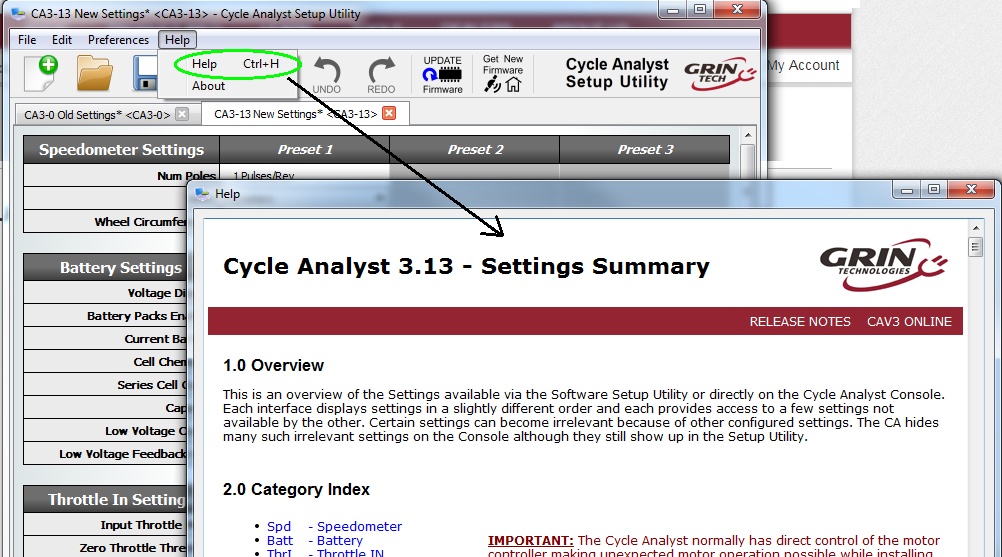
For each firmware version, there is a complete set of release notes and explanation of all the settings installed as .html files in the data/help directory. These can be accessed from inside the setup utility software by cliking "Help->Help" which well display the setting and release information for the currently selected firmware.
Drivers and Details
Succesful communication with the Cycle Analyst for firmware updates and bulk setting changes requires a serial communication cable, which is plugged into the TRS jack on the Cycle Anlayst. Grin offers a USB->TTL serial communications cable with a nice 3 meter (9 feet) lead length to make it easier to reach the CA on your bike from a computer. This USB cable must be recognized as a COM port on your computer in order for the software to function. In general, both windows and MacOS will automatically install the correct drivers, but if your device is having issues recognizing the USB cable as a COM port it may be necessary to manually download the Virtual Com Port (VCP) drivers from FTDI
https://www.ftdichip.com/Drivers/VCP.htm
The Cycle Analyst must be externally powered up in order to communicate, it won't get power just from the programming cable alone. So either bring a laptop nearby to your ebike, or have a battery or other source at hand to turn on the CA.
Cables and Connector Pinouts
The V3 CA has a bundle of additional wires coming out of it in addition to the normal 6-pin CA-DP plug. These are input plugs for different sensors and accessories, mostly terminated with female JST-SM connectors, and their pinout and description is in the diagram below: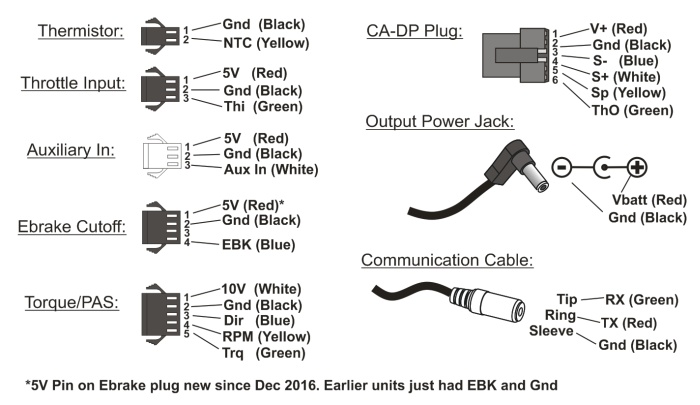
PAS and torque sensors are only compatible with battery voltages lower than 52V nominal when the Cycle Analyst is providing power for the device. Connecting a PAS or torque sensor to the CA3 above 52V nominal voltage may cause damage.
New 8 Pin Waterproof Plug for CA3-WP
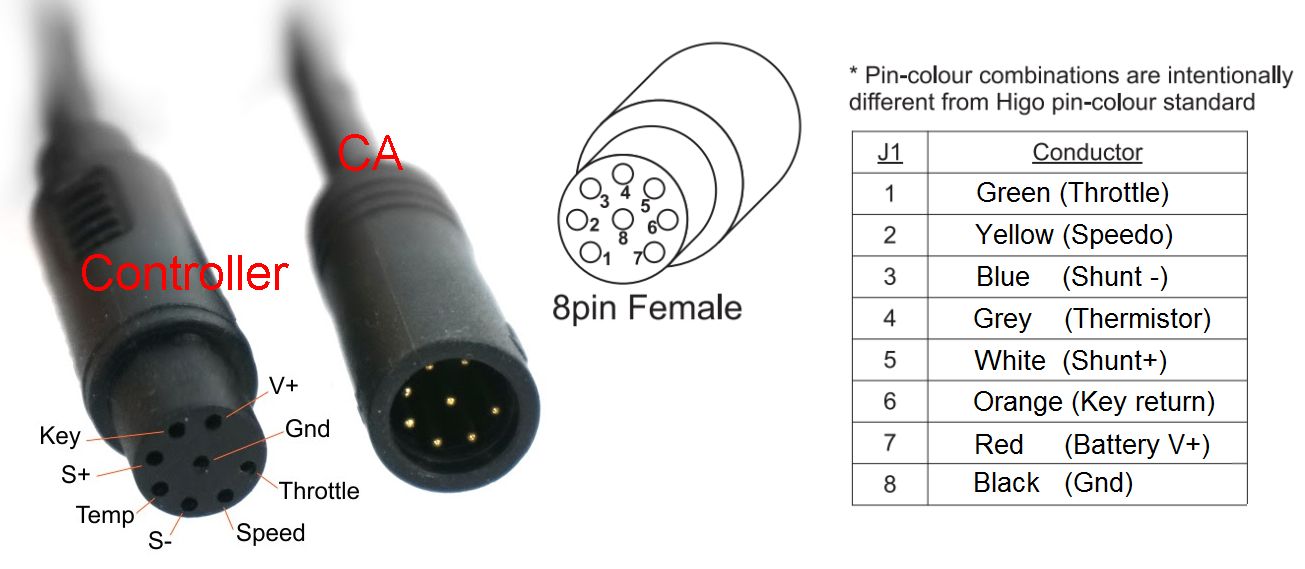
In 2019 we also introduced a new CA plug option based around the popular 8 pin waterproof HiGo main signal connector. The extra two pins allow us to pass extra wires for the motor temperature signal and an on/off power switch directly to the Cycle Analyst to reduce the amount of cable clutter. The pinout was chosen to be very similar to that used in Bafang and other systems that use an 8 pin main cable, only with the Tx and Rx communication wires connecting instead to Shunt+ and Shunt-.
At the moment we continue to offer CA3's in both models, but in 2020 we will switch to using the WP8 plug exclusively, and we will stock WP to JST adapter cables for those needing to mate an old CA3 to a new controller, or visa versa.
